Back pain is one of the most common reasons for missed work. Most people with low back pain recover only to have it return months later. Low back pain can be divided into two categories: acute or chronic. Acute low back pain is pain that comes on suddenly and lasts a few days to a few weeks. Chronic low back pain is defined as pain that lasts longer than 12 weeks, even after the initial injury or condition has been treated. Typically, acute low back pain is best treated with rest, ice/herbal topicals, and limiting activity. Chronic low back pain typically improves with exercises, stretches, and massage. The following list of exercises and stretches are predominantly for chronic low back pain and not recommended for acute back pain.
Chronic low back pain is often associated with weak core muscles, like the transverse abdominals (on the abdomen beneath the rectus abdominus) and multifidus (a deep muscle that runs along the spine in the lower back) and tight, tense muscles of the lower back and hips. Imbalances in muscle strength can contribute to poor posture, inflammation, and susceptibility to injury. Although there are a number of reasons for low back pain such as injury to muscles, ligaments, joints, or discs, strengthening the core muscles of the trunk can help protect from further injury. When there is an injury and/or inflammation in the low back, it may be felt through the entire lower body. The nerves that run from the lumbar spine innervate the muscles all the way down to the feet. The low back, or the lumbar spine, supports the weight of the upper body and allows us to bend and twist. The low back muscles allow us to flex and rotate the pelvis.Tight muscles prevent blood flow and circulation. causing limited range of motion. By increasing flexibility of the low back, blood flow and circulation provide fresh blood cells to reduce inflammation and decrease pain.
For disc injuries, however, such as herniations, loosening up muscles may cause more instability to the joints as the function of the muscles is to support and protect the spine. As a way to protect the joints and discs, the muscles get tighter and as they loosen, the joint must take on more of the support than it normally does. Be very cautious when doing exercises or stretches. Go gently and stop if there is any pain or discomfort.
Establish Neutral Spine
Neutral spine is crucial as a basis for all other exercises for the low back. It is also a way to explore the movement of the pelvis and the spine. When the pelvis moves forward and backward, the spine will follow.
- To find neutral spine, lie down on your back with your knees bent and your feet flat on the floor.
- Tilt your pelvis backward as far as you can go without pain and then release and return to the position where you started.
- Tilt your pelvis forward as far as you can go without pain and then release and return to the position where you started.
- Return to the center of those two positions where there is a gentle curve in your low back. This will be your neutral spine and the starting place for most of the following exercises.
Drawing In Maneuver
This is one of the most basic exercises to help support your low back and prepare for even more core stabilization exercises. Most people rely predominantly on the superficial muscles and have difficulty engaging deeper muscles of our core, causing instability of the joints and imbalances of the muscles. Over time, the deeper muscles become weaker and the superficial muscles become extremely tight and overused. This exercise forces activation of the deepest spinal stabilizer muscles, the transverse abdominal muscle. It also encourages the multifidus muscle to contract along side the transverse abdominal muscle. The ability to contract these two muscles together is key for stabilizing the low back.
- Lie down on your back with your knees bent, feet flat on the floor, and pelvis in neutral spine.
- Breathe in with a deep inhale.
- While keeping your pelvis in neutral spine, exhale and pull the belly button in towards the spine, using your abdominal muscles. Now draw muscles from behind your pubic bone to your tail bone and the left and right pelvic bones together as you imagine zipping a zipper to draw the pelvic floor up. No movement of the hip, pelvis or spine should occur.
- Hold for 5 seconds.
- Inhale and repeat 5 more times.
Many of us will experience a new sensation with this exercise as we recruit the transverse abdominal muscles. Recruiting these muscles regularly will allow us to recruit them during the middle of day while we are standing, walking, or sitting thereby supporting our back in a profound way and alleviating pain.
Knee to Chest Stretches
This stretch helps lengthen the muscles of the lower back and relieve tension. Keep in mind that this is a passive stretch so you want to keep the legs and hips as relaxed as possible. Think about releasing the muscles rather than powering through this exercise.
-
Lie down on your back with your knees bent, feet flat on the floor, and pelvis in neutral spine.
- While exhaling, draw in your abdominals muscles (see Drawing In Maneuver above) and use both hands to pull one knee up to the chest. Interlace your fingers just under the knee.
- Hold the knee against the chest for 5 seconds.
- Slowly lower the leg and repeat with the other leg.
-
Repeat 2-3x.
- If you would like to do both legs at the same time, bring one leg up and then the other. Hold for 5 seconds.
Low Back Rotational Stretches
This exercise can help release tension in lower back and into the hips. Be gentle as you go through this rotation. For disc issues, rotation can be a painful and difficult movement. Start gently and progress only as long as there is no pain.
- Lie back on the floor with bent knees and feet flat on the ground.
- Bring knees to the chest (as in the previous exercise) and then return the arms to the mat and extend the arms and keep shoulders firmly on the mat. Gently roll both bent knees over to one side, keeping the abdominal muscles engaged as you reach the ground. Modification: If rolling to the ground is difficult or causes any pain, wrap your arms around your knees and rotate only slightly without letting your knees reach the ground.
- Hold the position for 5–10 seconds.
- Return to the starting position.
- Gently roll the bent knees over to the opposite side, hold, and then return to the starting position.
- Repeat 2–3 times on each side.
Child’s Pose
This stretch is a very relaxing, gentle stretch to lengthen the spinal extensors muscles of the back. It constricts the diaphragm which encourages more movement in the back of the rib cage.
- Start in a crawling position on a mat.
- Then sit back onto bent legs, bringing your sits bones to your heels.
- Stretch out both arms out in front of you with your forehead resting gently on the mat. If you feel comfortable in this position, you can bring the arms down along your side with your palms face up. Some people will feel constricted in this position because the posterior rib cage is tight. Focus on breathing into the back of the rib cage and expanding the breath through the back.
- Round your back and tuck your tailbone.
- Breathe deeply for 5 breaths.
Small Hula Hips
This exercise helps you find the areas where there is the most tension. Go slowly and gently, observing where you feel any resistance and lingering longer in those areas.
- Stand with feet slightly wider than hip width apart. Keep knees slightly bent with your hands on your hips with neutral spine.
- Imagine you are drawing a small circle with the tip of your tailbone as you rotate your sacrum in one direction slowly. The hips and legs move very little as the focus is on the sacrum and tailbone.
- Switch directions.
- Repeat 5 times.
Large Hip Circles
- Stand with feet slightly wider than hip width apart. Keep knees slightly bent with your hands on your hips with neutral spine, engaging the abdominal muscles.
- Hold arms out to the side or on your hips. Extend the right hip all the way out to the right. And then all the way out to the left. Try to keep your upper body even without bouncing up and down.
- Now push the hips all the way forward and then all the way back. Keep your abdominals engaged and the head even without arching the back or lifting the chin.
- Combine all the 4 movements into one smooth movement.
- Move the hips to the right, then forward, then to the left, and then back. Repeat 4 times.
- Switch directions as you move the hips to the left, then forward, then to the right, and then back. Repeat 4 times.
Forearm Planks
The plank and side planks are some of the best exercises to build core strength and balance in deeper back muscles like the multifidus and quadratus lumborum muscles.
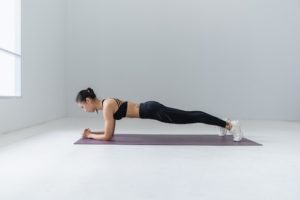
Photo by Li Sun
- Start in a crawling position on the mat.
- Place your forearms shoulder width apart on the floor with elbows below the shoulders and arms parallel to your body with your back in neutral position. If your wrists bother you, clasp your hands together in front of you. Gaze a bit in front of you, your nose should point towards the floor and neck parallel to the ground.
- Extend your right leg and then left leg back in the plank position, shoulder width apart on flexed toes. Keep your abdominals engaged with a neutral spine as you did in the Drawing In Maneuver above.
- Hold this position for 20-60 seconds.
- Now rotate to the side with one leg stacked on top of the other. Prop your body up on your left elbow while keeping your feet stacked. Place the right arm on your hips. You can increase the difficulty by raising your right arm and/or propping your body onto your left hand instead of the elbow.
- Hold this position for 20-60 seconds.
- Repeat on the other side.
- Repeat both sides 5 times.
It is not necessary to do all of these exercises every day. Pick just one or two to do every day for a week. You can add others if you have time. Abdominal muscles build up strength quickly – give it a week and let me know if you feel a difference!